17 January, 2020

Powershell ISE, HEX colors - Me make pretty!

This is just a way to add more color to the output in ISE.
Note that: There is no '-NoNewLine' available - 'PrivateData.' Does not include it.


# Note that in that '#AABBCCDD' pattern used below -
    # The 'AA' portion is the 'transparency' (followed by the HEX color value 'BBCCDD') - So;
        # FF, is the HEX equvalent of 255, full value, NO 'transparency' - Full color.
        # 80, in HEX, is equal to 128 (about half of 255), so would be about 50% 'transparency'
        # 00, in HEX, is 00 (zero), so would be completley transparent - No color.

# If that 'AA' portion is omitted, and just the #Hex value is used, it still works just fine.
    ## So, For example, on that '$host.PrivateData.ErrorBackgroundColor' line -
    ### '#7B00FF' and '#FF7B00FF' - Mean the same thing. NO 'transparency' - Full color.
   
If (($host.Name) -match "ISE") {
    # This just gathers the current / default Error reporting colors, so they can be restored.
    $ErrFgCol = (((((($host.privatedata) | Out-String).Split("`n|`r",[System.StringSplitOptions]::RemoveEmptyEntries))[13]).Split(':'))[1]).Trim()
    $ErrBgCol = (((((($host.privatedata) | Out-String).Split("`n|`r",[System.StringSplitOptions]::RemoveEmptyEntries))[14]).Split(':'))[1]).Trim()
        $host.PrivateData.ErrorForegroundColor  = '#FFFF8C00' # Set the color to Orange, for example.
        $host.PrivateData.ErrorBackgroundColor  = '#FF7B00FF' # Set the color to Purple, for example
            $host.UI.WriteErrorLine('▒▒▒▒▒▒▒▒▒▒▒▒▒▒')
            $host.UI.WriteErrorLine('         WORDS         ')
            $host.UI.WriteErrorLine('▒▒▒▒▒▒▒▒▒▒▒▒▒▒')
        $host.PrivateData.ErrorForegroundColor  = $ErrFgCol # Set the color back to its default - Red / '#FFFF0000'
        $host.PrivateData.ErrorBackgroundColor  = $ErrBgCol # Set the color back to its default - Red / '#00FFFFFF'
} Else {
Write-Host " This will only work in Powershell ISE." -ForegroundColor Yellow -BackgroundColor DarkRed
Write-Host "  Any key, to continue..." -NoNewline -ForegroundColor Green -BackgroundColor DarkCyan
Read-Host
}

break
# List all Hex values 0 - 255
0..255 | % {Write-Host "$_`: $((('{0:x2}' -f $_).ToString()).ToUpper())"}


17 November, 2019

Powershell sending to Google Voice, and also a Lease mileage tool...

Probably, the most useful part of this, is what it takes to send an email to a (your?, some other?) Google Voice (GV) conversation... I suppose.


So that part first...
In GV settings, make sure you have enabled "Forward messages to email".

Then from GV... Send a text message to your GV number.
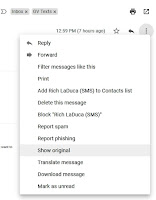
Head you your GMAIL account, and find that email notification from GV.
Click on the three vertical dots next to the 'reply' arrow, in this email, and select 'Show original':

Scroll down to find the 'From:' line...
This is the email address of this conversation, that you will use in your script:


The rest of this, is the script I have scheduled to run every day, telling me what my target mileage should be less than, and how many days I have left on this 39 month lease.
$ODOatStart = 18
$LeaseMileage = 325000 
$LeaseStarted = "11/16/2019"
$LeaseEnding = "02/16/2023"
$DaysHad = (((Get-date).AddDays(1))-[DateTime]'11/16/2019').Days
$TotalDays = 1189 # = ([DateTime]$LeaseEnding-[DateTime]$LeaseStarted).Days+1
$MilesPerDay = 27.33389 # = ($LeaseMileage/$TotalDays)
$MilesAllowed_Today = '{0:N0}' -f ([math]::Round(($DaysHad*$MilesPerDay)+$ODOatStart))

$Username = "joe.smith" # Just the username. Leave out the '@gmail.com'
$PW = "sr465bblo0986vfert65z" # Application Specific PW (because of 2-factor auth)
$EmailFrom = "joe.smith@gmail.com"
#$EmailTo = 5554441313@tmomail.net
# look at the 'From:' line of the raw email
  $EmailTo = "15551212.15551212.g45ty76vtrq@txt.voice.google.com"
$Subject = "Mileage Target"
$DaysLeft = '{0:N0}' -f ($TotalDays - $DaysHad)
$Body = "ODO: $MilesAllowed_Today  ($DaysLeft days left)"

$SMTPServer = "smtp.gmail.com"
$SMTPClient = New-Object Net.Mail.SmtpClient($SmtpServer, 587)
$SMTPClient.EnableSsl = $true
$SMTPClient.Credentials = New-Object System.Net.NetworkCredential($Username, $PW);
$SMTPClient.Send($EmailFrom, $EmailTo, $Subject, $Body)

#([datetime]"02/16/2023").ToString(“dddd, dd MMM yyyy”)

Some of the calculations ($TotalDays and $MilesPerDay) are commented out...
Plug in the variables, and (F8) run  just those...
Then run those calculations to get their fixed values.

([DateTime]$LeaseEnding-[DateTime]$LeaseStarted).Days+1
($LeaseMileage/$TotalDays)

Or run the calculations each time... Your call... I don't know your life. :-)

$TotalDays = ([DateTime]$LeaseEnding-[DateTime]$LeaseStarted).Days+1
$MilesPerDay = ($LeaseMileage/$TotalDays)

The only reason I hard code them in, is that these are 'fixed; values, and it makes the script run just a (nominal, but still) bit faster.

You can use this to send texts to a mobile phone directly too... 

The T-Mobile example is commented out.
And you can send to multiple recipients by separating addresses with a single comma, and encapsulating that in double quotes:

$OtherEmail = "5554441313@tmomail.net"
$EmailTo = "$OtherEmail,15551212.15551212.g45ty76vtrq@txt.voice.google.com" 

~ That last line was just me looking at what day of the week the lease ends on.

12 September, 2019

Powershell - Get computers IMEI, and SIM card number ~ Remote PC

I just went through a marathon session, setting up several Dell 7212 Rugged tablets, that came with their SIM card already inserted...

In order to activate the cellular capabilities with a carrier, the following two details are required...
     But these are kind of a hassle to get to. And to work with...
  •      The IMEI number (device ID)
  •      The SIM card number

I found it MUCH easier to get to this info from my own computer, than from the tablet, as follows:
   ~ Note - About the Test-WSMan, PsExec, and the winrm config...
    ~ These just make sure WinRM is enabled. 

     ~ 'Invoke-Command' requires WinRM


$Target = "HOSTNAME"

$TestCommand = $null
$TestCommand = Test-WSMan -ComputerName $Target
If (!($TestCommand)){C:\SysInternals\PsExec.exe -s -nobanner \\$Target /accepteula cmd /c "c:\windows\system32\winrm.cmd quickconfig -quiet"}

$Network_IMEI = Invoke-Command -ComputerName $Target -ScriptBlock { netsh mbn show interfaces }
$Network_SIM = Invoke-Command -ComputerName $Target -ScriptBlock { netsh mbn show read interface=* }
$IMEI = ((($Network_IMEI | select-string "device id").ToString()).Trim()).replace('              ','')
$SIM = ((($Network_SIM | select-string "SIM ICC Id").ToString()).Trim()).replace('       ','')
Write-Host "Cellular device info:" -ForegroundColor Cyan -BackgroundColor DarkGreen
$IMEI
$SIM

There's plenty of extra lines in there, to make it look pretty, but you should get the point, pretty easily.
The two pieces (from what I could see), are in different parts of the mnb. So... Two commands.

It took me a while to figure this all out... To get BOTH the IMEI number, and the SIM card number.

Hope it helps someone else!


27 March, 2019

Active Directory SID lookup.

Some notes on how to figure out what a specific AD SID value belongs to.

I was asked why a specific SID was showing up in an applications Security Alert logs.

That logging system tells the user that it is probably a 'Brute Force' attack from:
CORP\S-1-5-21-436374069-117609710-839522115-6608

I used GetADUser to filter for that SID... Nothing.

I opened up my search, and looked at all AD objects, but the SID value was not apparent.
Here is where I ended up:

$SID_Value = "S-1-5-21-436374069-117609710-839522115-6608"
Get-ADObject -Filter "objectSid -eq '$SID_Value'"

Saw that it WAS a Computer object - So, more details as follows:

Get-ADComputer ((Get-ADObject -Filter "objectSid -eq '$SID_Value'").Name)

04 January, 2019

Powershell array to CSV file

The easiest way to drop a Powershell array into a CSV file...

$Array | Out-File $SaveLocation -Append -Encoding Ascii

Assigning the text format is the trick - the CSV has to be in ANSI.

And just Out-File save it as a CSV


01 September, 2018

Powershell: Show Windows version build info, with UBR

I wanted to pull in all of the Windows version info into a variable...
Release Number, Build Number, and UBR / 'Update Build Revision'
https://blogger.googleusercontent.com/img/b/R29vZ2xl/AVvXsEjTrV1yZOn7JYpI-HAalskPH2wt67IV-Y_GuOd_oiZCvkCSnoohi35DmvZbj8GyzfE-pMjCqr8n4VIWOhRI4C3oGcA7luOmKxsIXuVvY-4qdV-ngJozlvEruvqZZV287xAlpfEXHOLxiKxN/s400/OSv04.jpg


These standard commands were lacking -
  • Get-WindowsEdition -Online 
  • [environment]::OSVersion
  • [environment]::OSVersion.Version
  • (Get-CimInstance Win32_OperatingSystem)version

The 'Release Number' and UBR don't show up.

The UBR is not super useful, except for adding completeness...
But the 'Release Number' is what most Windows version conversations rely on.

Sure, one can type 'winver', and see it in a pop-up window...
But I wanted something more tangible, and portable... As a $variable

Mostly - I wanted figure out how to get to this info from the command-line...

Anyway - It's in the Registry...
This does not require elevation. And it can be pulled in with one line (well two, but really one):
Get-ItemProperty 'HKLM:\SOFTWARE\Microsoft\Windows NT\CurrentVersion' `
|
select ReleaseID,CurrentBuildNumber,UBR
https://blogger.googleusercontent.com/img/b/R29vZ2xl/AVvXsEhGn520Snf7ufrrfvWTpcrGfY_MPZwDR77uJPVq0Bd71Z6dFBL0qicmhYtsC8Dc9CN9v5jdoMrfZH11J9vvqFva8ptqxYFP-r7jHk50mFOs_iVWcxc9MM11PViZQJAK59Tn7OYA34KYWsr-/s1600/OSv02.jpg


Or it can be prettied up with three lines:
$Reg_NT_CurVer = Get-ItemProperty 'HKLM:\SOFTWARE\Microsoft\Windows NT\CurrentVersion' `
|
select ReleaseID,CurrentBuildNumber,UBR
$BuildNo = ($Reg_NT_CurVer.CurrentBuildNumber)+"."+($Reg_NT_CurVer.UBR)
Write-Host " Version" $Reg_NT_CurVer.ReleaseID "(OS Bulld" $BuildNo") " -BackgroundColor Black
# On lines '1' and '2' above, that select is not really needed - I just put it there for clarity
https://blogger.googleusercontent.com/img/b/R29vZ2xl/AVvXsEgIXHmGAGIyfhMgt6Oan51zJSz5lEZubR9s3hFa5_RQAW2KNHgFIZAd9JdWpPGPIeZy2moNPHN8uhAknmBsxZxg5LSvZtzLwD7f1GBeqoKAsw99Eu8_l7rZtY7JSlvtDPbwVDrdmfM2T28E/s1600/OSv01.jpg


Some additional notes:
# ReleaseID / Release is coded 'YYMM' - So, for example: '1803', was released 2018 March
# CurrentBuildNumber / CBN
# UBR is 'Update Build Revision'

# Below is just another way of putting the same info on screen.
# I re-labled the headers. The 'Out-String trim', just removes extra lines'

Write-Host "~~~~~~~~~~~~~~" -ForegroundColor Yellow
(Get-ItemProperty 'HKLM:\SOFTWARE\Microsoft\Windows NT\CurrentVersion' `
|
FL @{L='Release';E={$_.ReleaseID}},@{L='CBN';E={$_.CurrentBuildNumber}},@{L='UBR';E={$_.UBR}} `
| Out-String).Trim()     # (FL = format-list)

Write-Host "~~~~~~~~~~~~~~" -ForegroundColor Yellow
(Get-ItemProperty 'HKLM:\SOFTWARE\Microsoft\Windows NT\CurrentVersion' `
|
FT @{L='Release';E={$_.ReleaseID}},@{L='CBN';E={$_.CurrentBuildNumber}},@{L='UBR';E={$_.UBR}} `

| Out-String).Trim()     # (FT = format-table)
https://blogger.googleusercontent.com/img/b/R29vZ2xl/AVvXsEjt24a5TVN3zlEpgnLCLk9T_MqeSwoRfZ9hsvG49FbpKPW3FHVU6rAbsXv3UYGo55a1Kf_phg8VbNvujqVinRWIib_MrGsj9CwQdMSgviyaamy28LyuGUZ6u1NMA5SUWcWeJsivzq7v-bSB/s1600/OSv03.jpg


19 August, 2018

Powershell TWAIN / scan from USB

This is just me being lazy, really...
  1. Plug in USB scanner...
  2. Start Button
  3. Open the 'Devices and Printers' applet
  4. Find the scanner
  5. Right-Click, and 'Start a Scan'

Or -
Write something that will find the scanner, and open the 'Start a Scan' window, when the script is ran...


I enabled the Quick Launch bar, and have this in there as a shortcut - I just changed the icon to a 'scanner'. (from here: %SystemRoot%\System32\SHELL32.dll)


This is the command for the shortcut...
Target:
C:\Windows\System32\WindowsPowerShell\v1.0\powershell.exe –NoProfile -windowstyle hidden -file "C:\Users\Rich\PSScripts\StartScan.ps1"

This line can be ran, to discover the 'Device description' for your device...
(gwmi Win32_USBControllerDevice |%{[wmi]($_.Dependent)}).Description

Here is the scripts text:
$DeviceDesc = "CanoScan"
$FindTWAIN = (gwmi Win32_USBControllerDevice |%{[wmi]($_.Dependent)} | Where-Object {($_.Description  -match $DeviceDesc)})
If ($FindTWAIN.Name -match $DeviceDesc){
$DeviceID = ($FindTWAIN.DeviceID).Replace("\","#")
$ClassGuid = $FindTWAIN.ClassGuid
$FullCommand = "`"C:\WINDOWS\system32\rundll32.exe`" fdprint,InvokeTask /ss `"\\?\"
$Params = "`"\\?\"+$DeviceID+"#"+$ClassGuid+"`""
& "C:\WINDOWS\system32\rundll32.exe" fdprint,InvokeTask /ss $Params
}

If ($FindTWAIN.Name -Notmatch $DeviceDesc){
#######################
$MsgBoxInfo = "$DeviceDesc device not found..."
[void] [System.Reflection.Assembly]::LoadWithPartialName("Microsoft.VisualBasic")
[Microsoft.VisualBasic.Interaction]::MsgBox($MsgBoxInfo, "OKOnly,SystemModal,Exclamation", "Nothing Found.") | Out-null
 ## Out-null just supresses the 'ok' to the (ISE?) screen, after pressing the OK button.
#######################
}